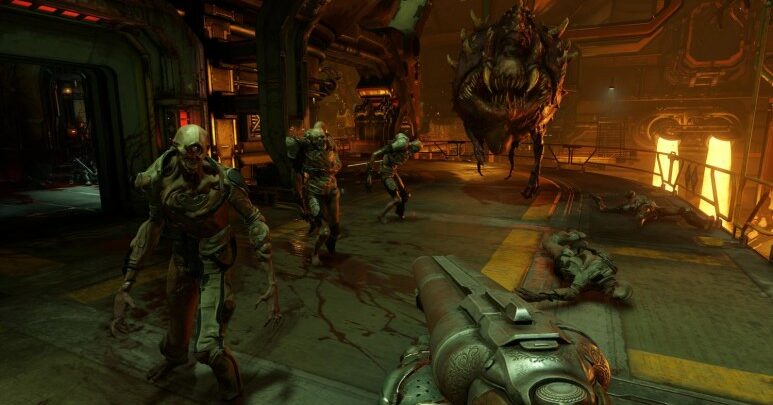
IoT

Ultrasonic garage parking assistant with ESP8266 and IBM Watson IoT platform

Parking cars in garages can be a challenge when you’re in a hurry, or your new car or garage is just a bit too tight. I accepted my wife’s suggestion to create a system to help her to parking. My wife has a car without parking sensors.

So I built a simple ultrasonic garage parking assistant based on ESP8266 microcontroller and an ultrasonic distance sensor. The ultrasonic distance sensor is able to measure the distance between the vehicle and the wall. You can read an introduction about the ESP8266 microcontroller here.

There are many projects around the web regarding this topic, for example “the parking assistant with Arduino and an ATtiny85” or “the parking sensor using a NeoPixel led ring and distance sensor”, but my idea a bit different, I’m using the IBM Watson IoT platform to collect the ultrasonic range data and a web dashboard to display the real-time distance from the car and the wall. My wife can use a sort of app for smartphone during the parking 🙂

From software point of view, to implement the ultrasonic garage parking assistant with ESP8266 and IBM Watson IoT platform I used nodeRED on Bluemix. As web dashboard I used freeboard.io to display on the smart phone the real-time distance.

From hardware point of view I connected my nice ESP8266 microcontroller to an US-100 ultrasonic distance measurement device to measure the distance to an object placed in front of the device. The distance can be displayed on the console (serial monitor) or send by mqtt protocol everywhere:

Ultrasonic garage parking assistant with ESP8266 and IBM Watson IoT platform
US-100 Ultrasonic distance sensor module

The Us-100 has 5 pins on the board, I connected the vcc pin using a wire to the 3.3v connector on the ESP8266 and the gnd to one of the gnd connectors.  The trig and echo pins are connected to digital pins D6 and D5 of the ESP8266.

The US-100 ultrasonic sensor can operate in two modes. I used the pulse width mode, in this way the sensor uses two pins and sends out an echo when the trigger pin is raised.  The device software than waits for an echo to appear and calculates the time it took for the echo to return. It then calculates the distance. This is my breadboard:

Ultrasonic garage parking assistant with ESP8266 and IBM Watson IoT platform
us 100 ultrasonic on the esp8266 board

As many of you know, the ESP8266 is an Arduino compatible microcontroller and can be programmed with the Arduino IDE using the ESP8266 board support. I prepared a sketch to connect an ESP8266 to IBM Watson IoT Platform with Arduino SDK, using the WiFiClient library to connect my microcontroller to wi-fi network and the MQTT and PubSubClient library  to publish the data.

My sketch:

// Sketch to publish distance readings from
// an attached sensor to IBM Watson IoT Platform.
// Mario Noioso - 2016

#include <SPI.h>
#include <ESP8266WiFi.h>
#include <WiFiClient.h>
#include <MQTT.h>
#include <PubSubClient.h>
#include "Ultrasonic.h"

static const uint8_t TRIGGER_PIN = 12;   // pin D6 is the trigger pin
static const uint8_t ECHO_PIN = 14;         // pin D5 is the echo pin

// create a ranging device object
Ultrasonic ultrasonic(TRIGGER_PIN, ECHO_PIN);


int status = WL_IDLE_STATUS;       // WiFi status.

#define MAX_MSG_LENGTH 100
char msg[MAX_MSG_LENGTH];

int MQTT_PORT=1883;                
String server = "YOUR_ORGID.messaging.internetofthings.ibmcloud.com"; // IoT Server
String CLIENT_ID = "d:YOUR_ORGID:YOUR_DEVICE_TYPE:YOUR_DEVICEID";

// registered device
String AUTHMETHOD = "use-token-auth";
String AUTHTOKEN = "YOUR_TOKEN";

String PUBLISH_TOPIC = "iot-2/evt/status/fmt/json";
String SUBSCRIBE_TOPIC = "iot-2/cmd/+/fmt/json";

// variables to remember the measurements
int  lastRange = -1;
int  range = -1;


// Setup WiFi SSID and Password                   
char ssid[] = "YOUR_WIFI_SSID";                      
char pass[] = "YOUR_WIFI_PASSWORD";                

WiFiClient wifiClient;
PubSubClient client(wifiClient, server, MQTT_PORT);

void setup() {
  // initialize the serial port for debugging
  Serial.begin(115200);
  // wait for serial to initialize
  delay(2000);
 
// Initialize the WiFi client library and connect to Wifi network:
  while ( status != WL_CONNECTED) {
    Serial.print("Conn SSID=");
    Serial.println(ssid);
    status = WiFi.begin(ssid, pass);
    
    // wait up to 3 seconds for WiFi connection:
    int count = 0;    
    while ((count < 3) && (status != WL_CONNECTED)) {
      delay(1000);
      count++;
      status = wifiClient.connected();
    }
  }
 
  printWifiStatus();
}

void loop() {
  int rc = -1;
  if (WiFi.status() == WL_CONNECTED){
    if (!client.connected()){
      Serial.println("Conn MQTT");
      if (client.connect(MQTT::Connect(CLIENT_ID).set_auth(AUTHMETHOD, AUTHTOKEN)))
        Serial.println("Connected to MQTT server");
    }
  }

  // get the current range from ultrasonic sensor
  range = getRange();
   
  if (range >= 0) {
    // send to the console
    Serial.print(range);
    Serial.println(" CM");
 
    if (client.connected()) {
      // create message in JSON format
      buildMsg(range);

      // publish the message
      if (!client.publish(PUBLISH_TOPIC, msg)) {
        Serial.print("Pub failed rc=");
        Serial.println(rc);
      }
    } else {
      Serial.println("Not connected for publication");
    }
  }
 
  // check if MQTT client is connected
  if (client.connected()){
    client.loop();
  }

  // measure 10 times a second
  delay(100);
}


void printWifiStatus() {
  // print the SSID of the network we are attached to:
  Serial.print("WPA SSID: ");
  Serial.println(WiFi.SSID());
 
  // print the IP address:
  IPAddress ip = WiFi.localIP();
  Serial.print(" IP=");
  Serial.println(ip);
 
  // print the received signal strength:
  long rssi = WiFi.RSSI();
  Serial.print(" RSSI=");
  Serial.print(rssi);
}


int getRange() {
  return ultrasonic.Ranging(CM);
}

void buildMsg(int range) {
  // convert integer to string
  char r[7];
  itoa(range, r, 10);
 
  // clear the current msg
  for (int i=0; i<MAX_MSG_LENGTH; i++) {
    msg[i] = 0;
  }
 
  // start to build the message
  strcpy(msg, "{\"Range\": ");
  strcat(msg, r);
  strcat(msg, "}");
}

I registered the device on IBM Watson IoT platform dashboard, with my ORGID, DEVICE_TYPE, DEVICEID and TOKEN:

Ultrasonic garage parking assistant with ESP8266 and IBM Watson IoT platform
registered device in IBM Watson IoT platform

I connect my device to the IoT Insight platform, I added some insights and statistics about the parking data:

Ultrasonic garage parking assistant with ESP8266 and IBM Watson IoT platform
IBM Watson IoT platform analytics real time insights for ultrasonic range


I used nodeRED to handle the sensor data. To get in real-time the distance from the car and the wall I used as input node the IBM Internet of Things Foundation node and a dweet node to display data. Dweet enables your sensor data to become easily accessible through a web based rest-API, allowing you to quickly make apps or simply share data, so I started to dweet my distance data.

My preferred web dashboard, the freeboard, can use as data-source dweet.io to display data in real-time on the dashboard. This is my simple node-RED flow:

Ultrasonic garage parking assistant with ESP8266 and IBM Watson IoT platform
ultrasonic range data to web dashboard

on the freeboard web dashboard I am able to see the distance of an object from the ultrasonic sensor:

Ultrasonic garage parking assistant with ESP8266 and IBM Watson IoT platform
ultrasonic range on freeboard

Finally I moved my ESP8266 microcontroller with the ultrasonic distance sensor in my garage. I used an external USB battery device to power the board:

Ultrasonic garage parking assistant with ESP8266 and IBM Watson IoT platform
parking sensor with ESP 8266


on wife’s smartphone the web dashboard shows in real-time the distance between the car and the wall:

Ultrasonic garage parking assistant with ESP8266 and IBM Watson IoT platform
parking sensor on web dashboard

here the simple web dashboard:

Ultrasonic garage parking assistant with ESP8266 and IBM Watson IoT platform
Ultrasonic sensor data on web dashboard

that’s all !

It’s very funny to use the new IBM’s technologies, greetings from my car 🙂


Related Articles

5 Comments

  1. I am very new to Arduino community. the ultrasonic sensor that you used “ultrasonic.h” .. i get an error when ever i try compiling the code saying that ulrasonic.h is undefinable. could you please help

Back to top button