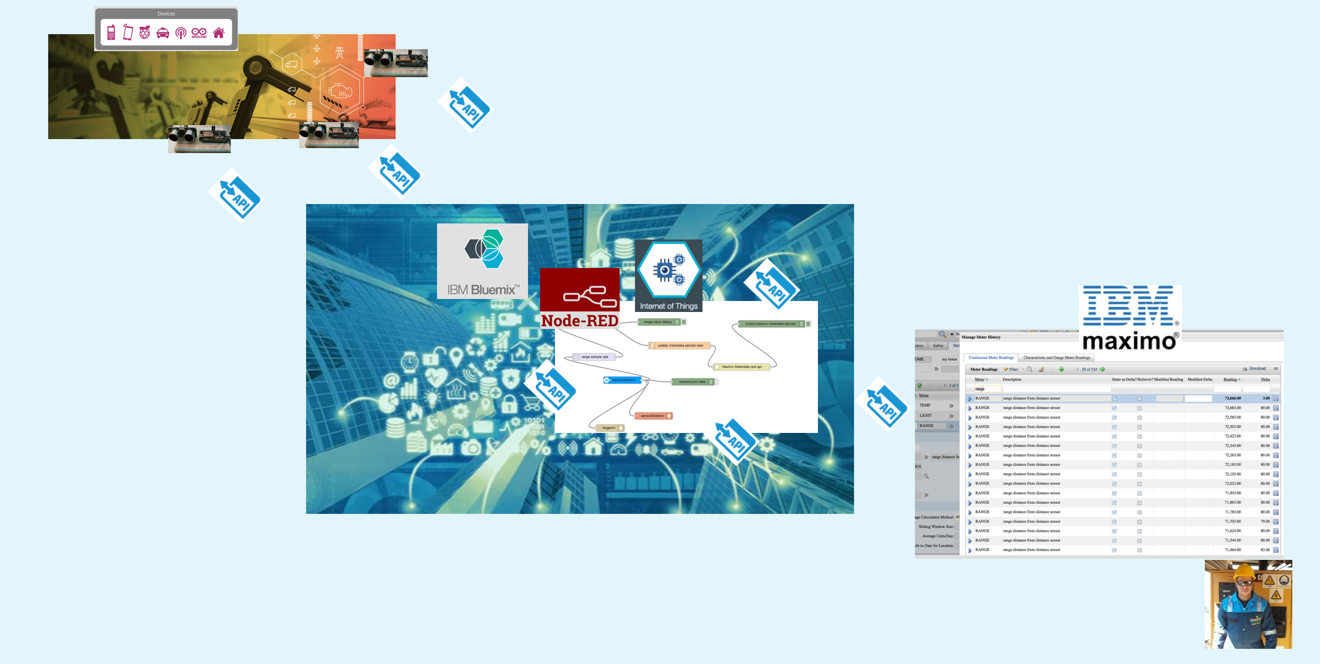
The best way to approach to the IoT world it’s for fun , the other way to approach to the IoT is to connect devices and build applications that learn from the physical world and analyze data from any source. The IBM Watson IoT platform scaling through cloud-based services and using rich analytics, it provides organizations with new insight for innovation and transformation.
In this articles I’m going to provide the code developed to implement the End-to-End Scenario: how to load Maximo meter readings via IBM Watson IoT platform.
For a theoretical point of view I suggest to read previous posts.
I used the ESP8266, a microcontroller Arduino compatible, as IoT device, and IBM Maximo asset manager as application and industry solution. If you’re just starting out, read Connect an ESP8266 to IBM Watson IoT Platform with Arduino SDK.
There are three stages:
First the IoT device sends data to IBM IoT platform by MQTT protocol. Here is the sketch to connect an ESP8266 to IBM Watson IoT Platform with Arduino SDK, using the WiFiClient library and the MQTT and PubSubClient library
// Sketch to publish distance readings from
// an attached sensor to IBM Watson IoT Platform.
// Mario Noioso - 2016

#include <SPI.h>
#include <ESP8266WiFi.h>
#include <WiFiClient.h>
#include <MQTT.h>
#include <PubSubClient.h>
#include "Ultrasonic.h"

static const uint8_t TRIGGER_PIN = 12;   // pin D6 is the trigger pin
static const uint8_t ECHO_PIN = 14;         // pin D5 is the echo pin

// create a ranging device object
Ultrasonic ultrasonic(TRIGGER_PIN, ECHO_PIN);


int status = WL_IDLE_STATUS;       // WiFi status.

#define MAX_MSG_LENGTH 100
char msg[MAX_MSG_LENGTH];

int MQTT_PORT=1883;
String server = "YOUR_ORGID.messaging.internetofthings.ibmcloud.com"; // IoT Server
String CLIENT_ID = "d:YOUR_ORGID:YOUR_DEVICE_TYPE:YOUR_DEVICEID";

// registered device
String AUTHMETHOD = "use-token-auth";
String AUTHTOKEN = "YOUR_TOKEN";

String PUBLISH_TOPIC = "iot-2/evt/status/fmt/json";
String SUBSCRIBE_TOPIC = "iot-2/cmd/+/fmt/json";

// variables to remember the measurements
int  lastRange = -1;
int  range = -1;


// Setup WiFi SSID and Password
char ssid[] = "YOUR_WIFI_SSID";
char pass[] = "YOUR_WIFI_PASSWORD";

WiFiClient wifiClient;
PubSubClient client(wifiClient, server, MQTT_PORT);

void setup() {
  // initialize the serial port for debugging
  Serial.begin(115200);
  // wait for serial to initialize
  delay(2000);

// Initialize the WiFi client library and connect to Wifi network:
  while ( status != WL_CONNECTED) {
    Serial.print("Conn SSID=");
    Serial.println(ssid);
    status = WiFi.begin(ssid, pass);

    // wait up to 3 seconds for WiFi connection:
    int count = 0;
    while ((count < 3) && (status != WL_CONNECTED)) {
      delay(1000);
      count++;
      status = wifiClient.connected();
    }
  }

  printWifiStatus();
}

void loop() {
  int rc = -1;
  if (WiFi.status() == WL_CONNECTED){
    if (!client.connected()){
      Serial.println("Conn MQTT");
      if (client.connect(MQTT::Connect(CLIENT_ID).set_auth(AUTHMETHOD, AUTHTOKEN)))
        Serial.println("Connected to MQTT server");
    }
  }

  // get the current range from ultrasonic sensor
  range = getRange();

  if (range >= 0) {
    // send to the console
    Serial.print(range);
    Serial.println(" CM");

    if (client.connected()) {
      // create message in JSON format
      buildMsg(range);

      // publish the message
      if (!client.publish(PUBLISH_TOPIC, msg)) {
        Serial.print("Pub failed rc=");
        Serial.println(rc);
      }
    } else {
      Serial.println("Not connected for publication");
    }
  }

  // check if MQTT client is connected
  if (client.connected()){
    client.loop();
  }

  // measure 10 times a second
  delay(100);
}


void printWifiStatus() {
  // print the SSID of the network we are attached to:
  Serial.print("WPA SSID: ");
  Serial.println(WiFi.SSID());

  // print the IP address:
  IPAddress ip = WiFi.localIP();
  Serial.print(" IP=");
  Serial.println(ip);

  // print the received signal strength:
  long rssi = WiFi.RSSI();
  Serial.print(" RSSI=");
  Serial.print(rssi);
}


int getRange() {
  return ultrasonic.Ranging(CM);
}

void buildMsg(int range) {
  // convert integer to string
  char r[7];
  itoa(range, r, 10);

  // clear the current msg
  for (int i=0; i<MAX_MSG_LENGTH; i++) {
    msg[i] = 0;
  }

  // start to build the message
  strcpy(msg, "{\"Range\": ");
  strcat(msg, r);
  strcat(msg, "}");
}
You have to register the device on IBM Watson IoT platform with your ORGID, DEVICE_TYPE, DEVICEID and TOKEN
Then a nodeRED flow handles the data and updates the Maximo’s meter:
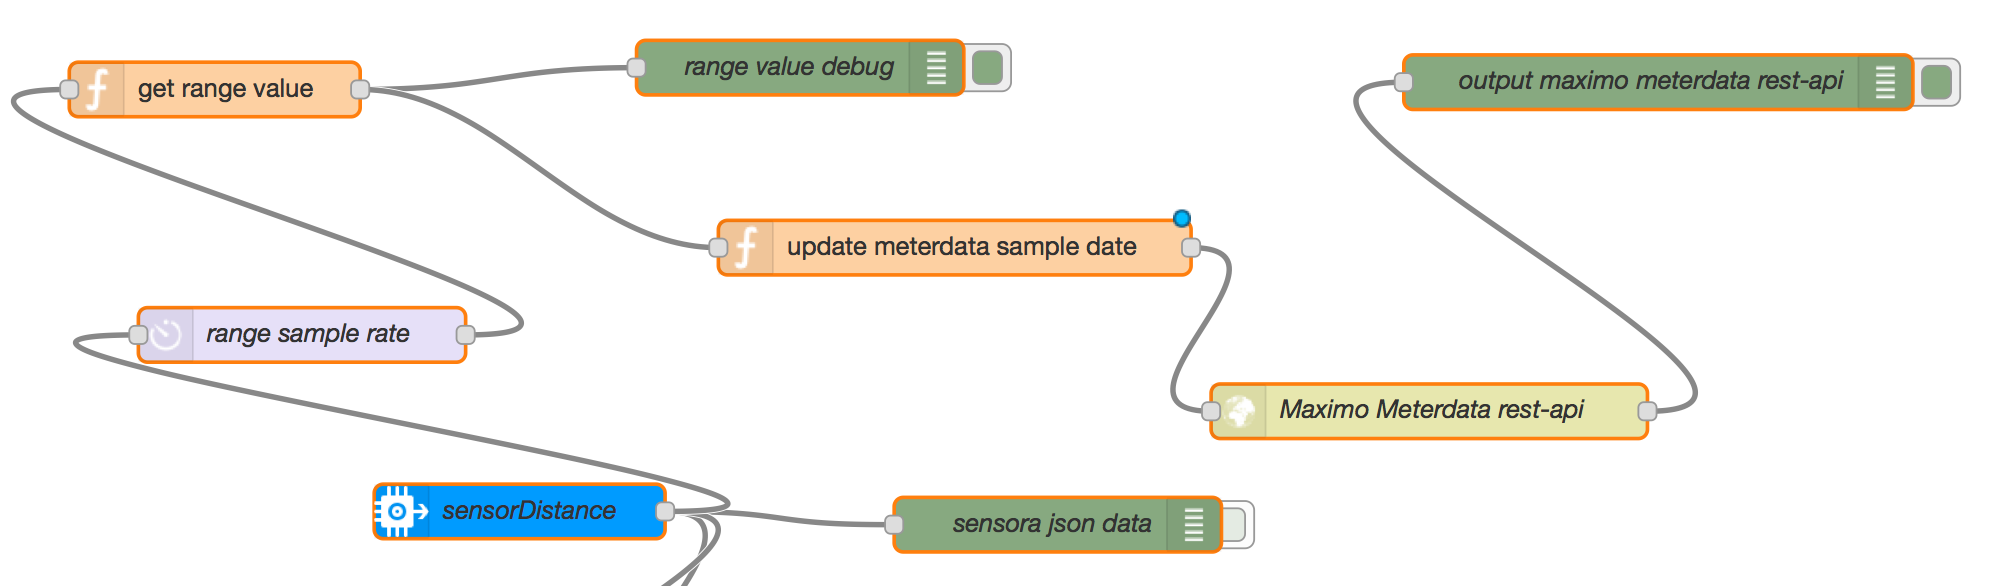
Here is my Node Red code, use the import from clipboard utility to copy and paste this flow into your Node Red environment:
[{"id":"1e99c765.6e6621","type":"ibmiot","z":"3362e4f1.ea6d2c","name":"sensorDistance"},{"id":"4142fb8.9defb04","type":"ibmiot in","z":"3362e4f1.ea6d2c","authentication":"apiKey","apiKey":"1e99c765.6e6621","inputType":"evt","deviceId":"noioso2001","applicationId":"","deviceType":"+","eventType":"+","commandType":"","format":"json","name":"sensorDistance","service":"registered","allDevices":true,"allApplications":"","allDeviceTypes":true,"allEvents":true,"allCommands":"","allFormats":true,"x":303.15000915527344,"y":390.53330993652344,"wires":[["ec1af9de.ac63e","5b06a4f0.1c0ebc","784b2319.f8e3b4","96cc3c87.b80fc8"]]},{"id":"ec1af9de.ac63e","type":"debug","z":"3362e4f1.ea6d2c","name":"sensora json data","active":false,"console":"false","complete":"payload","x":599.1500091552734,"y":397.81666564941406,"wires":[]},{"id":"17d33656.f6a542","type":"function","z":"3362e4f1.ea6d2c","name":"get range value","func":"return {payload:msg.payload.Range};","outputs":1,"noerr":0,"x":135.4499969482422,"y":158.4499969482422,"wires":[["31d7f938.dc9516","c87baeed.868a5"]]},{"id":"31d7f938.dc9516","type":"debug","z":"3362e4f1.ea6d2c","name":"range value debug","active":true,"console":"false","complete":"payload","x":457.45001220703125,"y":146.4499969482422,"wires":[]},{"id":"c87baeed.868a5","type":"function","z":"3362e4f1.ea6d2c","name":"update meterdata sample date","func":"function dateFormat (date, fstr, utc) {\n utc = utc ? 'getUTC' : 'get';\n return fstr.replace (/%[YmdHMS]/g, function (m) {\n switch (m) {\n case '%Y': return date[utc + 'FullYear'] (); // no leading zeros required\n case '%m': m = 1 + date[utc + 'Month'] (); break;\n case '%d': m = date[utc + 'Date'] (); break;\n case '%H': m = date[utc + 'Hours'] (); break;\n case '%M': m = date[utc + 'Minutes'] (); break;\n case '%S': m = date[utc + 'Seconds'] (); break;\n default: return m.slice (1); // unknown code, remove %\n }\n // add leading zero if required\n return ('0' + m).slice (-2);\n });\n}\nvar dateNow = dateFormat (new Date (), \"%Y-%m-%dT%H:%M:%S\", true);\n\nvar maximoRest = \"http://MAXIMOIP/maxrest/rest/os/MXMETERDATA?_action=AddChange&location=MYHOME&siteid=SITEID&metername=RANGE&newreading=\";\nmsg.url = maximoRest + msg.payload + \"&newreadingdate=\" + dateNow + \"&_lid=maxadmin&_lpwd=PASSWORD\";\nnode.error(msg.url);\nreturn msg;","outputs":1,"noerr":0,"x":542.4500122070312,"y":245.4499969482422,"wires":[["8c0ee663.762738"]]},{"id":"8c0ee663.762738","type":"http request","z":"3362e4f1.ea6d2c","name":"Maximo Meterdata rest-api","method":"POST","ret":"txt","url":"","x":803.4500122070312,"y":335.45001220703125,"wires":[["757f46f3.8f0778"]]},{"id":"757f46f3.8f0778","type":"debug","z":"3362e4f1.ea6d2c","name":"output maximo meterdata rest-api ","active":true,"console":"false","complete":"payload","x":929.4500122070312,"y":154.4499969482422,"wires":[]},{"id":"96cc3c87.b80fc8","type":"delay","z":"3362e4f1.ea6d2c","name":"range sample rate","pauseType":"rate","timeout":"5","timeoutUnits":"seconds","rate":"1","rateUnits":"minute","randomFirst":"1","randomLast":"5","randomUnits":"seconds","drop":true,"x":183.4499969482422,"y":293.45001220703125,"wires":[["17d33656.f6a542"]]}]
You have to change the MAXIMOIP, SITEID and user PASSWORD inside the Maximo rest-API.
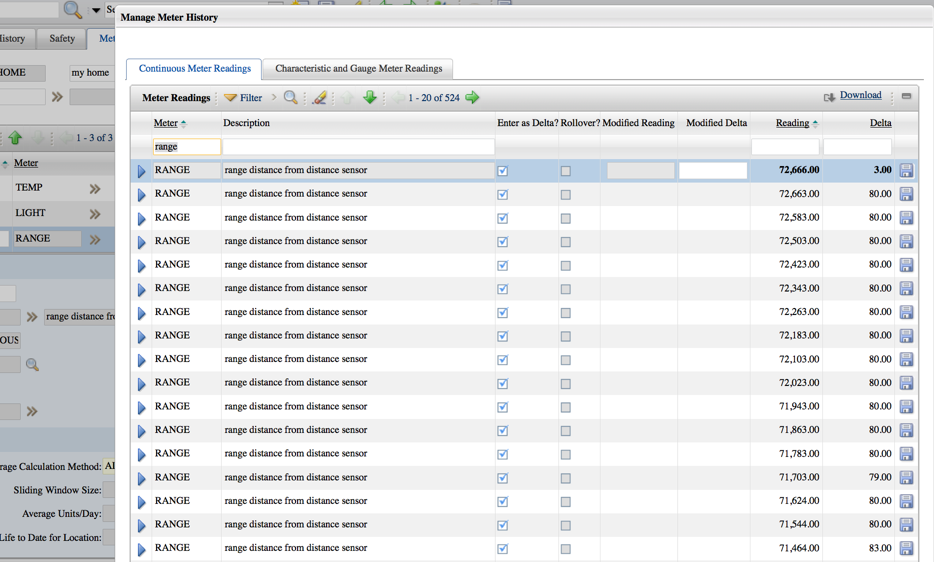
In the final stage you have to configure a location with a continuous meter called RANGE:
For more details contact me, your feedback is welcome.